Brassicas for the home garden

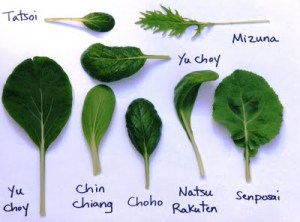
Broccoli is arguably my favorite vegetable. Not only for it’s taste, but also for it’s versatility. This year, I have decided to grow a few varieties of Asian Brassicas to diversify even more. I very much enjoy cooking with Rappini like greens such as Kailaan (B.o. alboglabra), Choy Sum (Brassica campestris var. Chinensis) and Yu Choy (Brassica campestris olifera), an edible variety of rape seed.

Most of these vegetables have a small broccoli-esque immature seed head surrounded by tasty kale-like leaves. They are wonderful stir-fried, broiled and steamed and each have their own unique flavours.

Here is a list of the Brassicas that are going into the garden this year:
Brassica rapa. (broccoli raab/rapini)Brassica calabrese (traditional broccoli) two varieties: a sprouting green and a sprouting white.
Brassica oleracea alboglabra. (Kailaan) Crispy blue and south sea cultivars. broc raab like.
B.campestris chinensis (Choy sum) leafy green between kale and broccoli.
B.c. oleifera (Yu choy) an edible var or rape seed.
B. pekinensis (Wong bok) a heading “kim chi” style cabbage.
B. juncea (Chi-sin) a ‘semi-heading’ cabbage
B.o. (Heading Cabbage)

Brassicas are notoriously vulnerable to pests. Interplanting them with aromatic herbs and alliums (onions, garlic, chives etc) will help to protect the brassicas from damage. Chives are nice perennial alliums that will thrive in the same soil conditions as brassicas. Aromatic herbs with composite flowers, such as coriander, will help attract certain beneficial predator insects as well. There are endless variations on this theme that will work. Design within the context of your climate and needs.

Beneficial insects that predate upon aphids are great to have around your brassicas. It is important to keep in mind that most predatory insects (such as ladybugs whose larvae are voracious aphid munchers) reproduce on a longer cycle than Aphids. This means that the Aphids (or other natty beasties) will most probably get the upper hand for a while until the population of beneficials catches up. After a few years, and once your perennial flowers that act as nectaries (food source) and overwintering habitat (that includes more than just the perennial flowers) for the various predatory insects are well established, this gap between pests and their predators should get smaller. If, on the other hand, you let yourself be tempted into spraying poisons (organic or not) throughout the garden, the predators will never get the chance to catch up as their life cycles are longer than the pests’.

In the Okanagan, Brassicas may appreciate some shade (especially in the afternoon) if they are going to be growing through the hottest summer months. Trellises with cucurbits, peas, beans, tomatoes or any other climbing plant on them can work well. Planted in the afternoon shade of trees, large shrubs or structures, brassicas may be able to tough it through some of the warmer months of the summer.

A note on Kailaan: this is a very fast growing plant! do not start it more than a week or two before being able to transplant into the garden or a large enough pot. I made this mistake and found that after 3-4 weeks, my Kailaan are all going to flower on whimpy little stalks…

Most Brassicas need a good supply of Phosphorus to head up well. This means that planting dynamic accumulators of phosphorus around the brassicas and mulching them in place before the brassicas head up could help their growth. It is important to not that if one is trying to increase the amount of available phosphorus in the current growing season, planting a lot of dynamic accumulators may decrease the amount of available nutrients until they decompose. It has been noted that certain accumulators will exude the nutrients they accumulate through their roots. Therefore, if you plant a deep rooted accumulator of phosphorus such as Amaranth, alongside shallower rooted brassicas, the amaranth may be able to mine some minerals from deeper down than the brassicas can and help them flourish. On the other hand, planting an accumulator with a similar root profile as the crop you are trying to help may backfire and do exactly the opposite of what you are trying to accomplish!

Not only is it important to think about the roots but also about the soil that surrounds them. having a recent soil test can help you to adjust the soil chemistry to release nutrients that are currently unavailable. Soil science is extremely complex and I won’t go into any detail here but there are many wonderful resources freely available that can help any enthusiast learn more about this fascinating subject. Check the Resources page on this blog for a place to start.

For those who want to get savvy on their Asian veggies: http://www.thekitchn.com/know-your-asian-greens-98840

Asian-Greens


Lessons Learned

So far I have learned that these Asian brassicas grow very VERY fast! I thought I’d get a good head start on my Kailaan and started them in early April. 20 days later, after transplanting them each to round 2” pots, they were starting to flower…It was still dangerous to plant them outside and I was left with little baby kaillan, 2” tall. I tried pinching off the flowers on a few of them but instead of growing taller, they just decided to send out more flowers.

My mistake was stressing them and not transplanting them early enough. It will be too warm to plant any of these Asian brassicas in the summer as we regularly get 35-40 Celsius but I will try again in August. This time, I will start them in individual pots that are deeper and wider to allow their roots to really get going. As soon as they show their true leaves, I will pop them into the ground and feed them some compost tea.

Some varieties did much better than others. the South Sea Kailaan that I tried did not do so well, neither did the Yu Choy.
The Crispy Blue Kailaan however has been doing quite well and tastes wonderful raw or slightly cooked (flash fry/steam).
All of these have proved to be especially susceptible to pests, notably flea beetles. When I plant a late summer/fall batch, I will make sure to plant them near some Alliums and Flowering plants that attract beneficial insects.

I will keep an eye on the next batch and if i see any insect ‘damage’ I will use a foliar spray of equisetum (horse tail) and Achillea Millefolium (yarrow) flowers. I like to add these two plants to my compost tea only if insects are taking a little more than their fair share. If that doesn’t cut it, I might toss in some hot peppers and garlic too for extra muscle. I try to use this combo sparingly because I feel it most probably effects a broad range of insects and I don’t like interfering with the garden ecology more than I absolutely have to for fear of causing more damage than I can foresee.

Solar Dehydrators

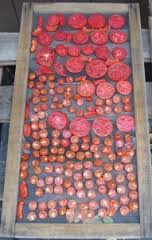
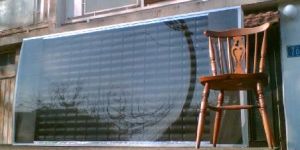
In the Okanagan, we are blessed with an abundance of hot, dry weather from the end of May until September. This allows us to preserve part of our harvest using solar energy with little or no technology. For many years, we have dried early cherries and tomatoes on racks such as these, laid out in a sunny place to great success.

solar drying

They need to be taken in every night but it works quite well for smaller things that dry quickly.

This year, I want to step up the drying and taking 20 or 30 trays in and out of the house every day seems like a waste of time. I want to share some of what I found and what I am thinking of implementing.

There are a seemingly infinite designs for solar food dryers/dehydrators and this is by no means an exhaustive list. I have simply included 4 methods and designs that I have come across that seem like they are reasonbly DIYable. I encourage folks to post other designs in the comments section and to splice multiple designs together to create appropriate hybrids. I have only included designs that are entirely passive, meaning they use no outside energy or moving parts to aid drying. These babies need not but the sun and the ability to use basic hand tools. Enjoy!

direct sun: laying trays (like the ones in the picture above with sliced tomatoes) out in a sunny place on a warm, dry day.
Advantages: low tech, low cost, simple.
Disadvantages: susseptible to changing weather, may take longer than other      methods, and vulnerable toanimal and insect damage.

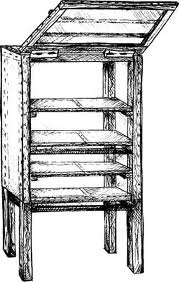
Basic Hot Box: A closed container with one transparent side to let the sun it (can be glass, plexiglass, plastic, etc) that has air vents at the bottom to let fresh air in and vents at the top to let hot moist air out.

Solar Dryer old timey
Advantages: these are easy to build and one can use just about anything that is lying around to knock ’em together. They can be build to fit any space from a small window in an apartment to a large backyard. Easily scalable.
Disadvantages: Food is in direct sunlight which can be undesirable for certain medicinal herbs. In low light environments, these won’t work very well. They need good sunlight to keep airflow and gather heat.

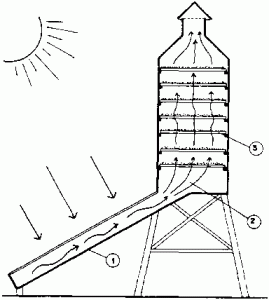
Bottom Fed Dryer: This is a style of design that uses a solar collector to gather air and move it up a ramp into a drying chamber. HERE is a great article about this style of design.

bottom fed solar dryer
Advantages: These can be very effective and dry even in low light environments (within reason…). Don’t expose the material being dried to direct sunlight.
Disadvantages: They are big and require slightly more carpentry skills to build well. They cab get too hot and burn up what you are drying if you don’t keep an eye on ’em on a realy hot sunny day.

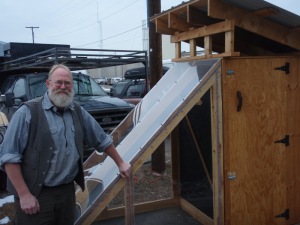
Top Fed Dryers: This is an interesting design that I have seen work well in you tube videos sun as the second of three in THIS one. These dryers can have very good airflow if they are build well. This means that they use moving air as well as heat to dry things. One might think that since hot air rises, it would not be possible to get the air flowing without a fan. Not so. If they are airtight the air will flow up the chimney. In one of the video tutorials I watched, someone said that humid air is heavier than dry air and therefore falls to the bottom of the dryer naturally. Not so. THIS article shows that humid air is actually lighter than dry air.
OLYMPUS DIGITAL CAMERA

-Advantages: use air flow to dry and thus help reduce mold and bacteria growth. Keep food out of the sun. Dry fairly quick. Large capacity.
-Disadvantages: Much more difficult to build. to get good airflow, they need to be airtight. More expensive to build. bulky and hard to move.

*ASIDE* I want to take a second to give a shout out to Paul Wheaton and his Permies.com forum. The above video is one of Pauls and has three wonderful designs for solar dehydrators in it.

The design I am looking at would splice a few of the above mentioned designs together to fit the materials that are available. Although I would love to build a top fed dryer, I don’t have the time, money or skill to make one. I like the bottom fed design. I think I will use a tin can collector to super charge the heat. SOlar COllector Cans

hopefully it won’t get too hot in the okanagan sun…The main concerns for this design are keeping the insects off of the fruit I will be drying, being able to leave the dryer out over night, using a minimum of new materials and having a large capacity.
When it’s all said and done, I will post some pictures and lessons learned. Any comments are welcome!


Land Dwelling Crustaceans?

That’s right folks, they exist! and what’s more, if you have ever put your hands in the soil, moved an old board, brick or stone, you’ve seen them too.

The creature I am referring to is an isopod, specifically Armadillidium
vulgare
, commonly known as the ‘pill bug’. This creature, and other similar anthropods such as the ‘sow bug’ or ‘woodlouse’, Oniscus asellus are land dwelling crustaceans.

These are fantastically interesting creatures and play an important role in the garden ecosystem as decomposers. They feed mostly off of decaying plants and fungi. As there is a great concentration of both these food sources around the roots of plants, this is one local where they are commonly found. As they munch on decomposing feeder roots and dying mycorrhizal fungi, they can cause some root damage to living plants. They can also cause some damage to young seedlings and sprouting seeds. for this reason, if there is an imbalance in the ecosystem, they can cause some unwanted damage to the garden.

How can one deal with these rolly polly bugs? As any good permie knows: “the problem is the solution”. These isopods have many common predators that can be of great use in any garden such as spiders, toads and frogs, chickens and other birds as well as snakes and lizards.

One good option is creating habitat niches for natural insect predators.
-rock piles for snakes and lizards
-bird feeders to attract some feathered friends
-a chicken/duck/goose coop
-a pond pr water feature that can support ducks and other birds as well as amphibians such as frogs and toads.
-a wildlife corridor (if possible) that extends up to the garden will help bring in native predators of all kinds.

Diatomaceous earth can also dry out these bugs but will also dehydrate and kill a whole host of other insects that we want to encourage in our garden. This should be used only in extreme cases and sparingly at that.

Ultimately, these friendly land dwelling crustaceans should not be seen as pests but rather as friends, helping areate our soil as they crawl around in there and break down organic matter as them munch on decomposing garden debris.

to a well balanced ecosystem!

Sources: about diatomeceous earth, about pill bugs 1 and 2

Cd3wd

From what I understand, Cd3wd is a project that aims at making development information available to folks living in developing areas of the world. a kind of “help people help themselves” initiative.

I think it’s fantastic.

It is an incredible resource for DIY projects of all kinds, from agriculture to education to entrepreneurship to livestock management and beyond. There is a bung lode of information in this database and all of it is available for free. I highly encourage folks to donate something to this project as it is more than a worthy cause whether you dl the content or not. They make the information available in disc formats as well for people who do not have access to a reliable Internet connection.

I like this page for navigation http://www.cd3wd.com/cd3wd_40/CD3WD/INDEX.HTM but they have a newly updated page with about twice the information on it at http://www.cd3wd.com/data/index.htm

Enjoy!

Soil and Health.org

As I sit indoors during these snowy/rainy winter months, I have ample time to peruse the interwebs for all kinds of agricultural info. Today in my e-meanderings, I stumbled across SoilAndHealth.org a free online database that is run out of tasmania.

I was reading a chapter out of  “Root Development of Field Crops” by John E. Weaver. I am looking into root development and interactions in the hopes of developing better plant guilds and seeing clear through the confusion surrounding companion planting. I will post my notes in the next while.

In the meantime, I highly encourage folks to scour the depths of this online library. There is a lot of good up in hurr.

www.soilandhealth.org